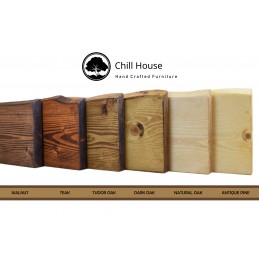
Wax Maintenance Packs
To keep your wood looking its best we have Wax Maintenance Packs available.
Our Packs are ideal to fix small damage to shelves or furniture. Wood wax is very easy to repair compare to other wood finishes. In our pack you will find everything you need to repair your wooden furniture from bumps, scratches and knocks that can happen in every home.
To apply a new coat of wax wipe over the item, ensuring that it is free from dust, then use the cloth to apply a small amount of wax whilst rubbing in the same direction as the grain of the wood. Leave the repaired area to dry for about 15mins. Your shelf now has a new shiny finish.
Wood Care
* It’s easy to care for your wooden furniture. For any spills or stains use a clean slightly damp cloth to wipe it off. You don’t want the water to sit on the wood so wipe it again with a dry cloth if you have to. Do not use any furniture sprays, kitchen or baby wipes or this can damage your wax finish.
* Natural wood can be affected by certain environmental changes. Don't worry about any bending or cracks caused by the change of temperature or humidity as this is the natural process that wood could encounter.
* To keep the wax finish looking brand new for years to come, we recommend applying a clear or colour wax or to the shelves once a year.
Fixings and Installation
You’ll receive all fixings in your packaging. All fixings are especially chosen and designed to fit your furniture. For shelves we recommend fixing them to solid wall types only. We cannot guarantee that the shelves will stay up if you use different fixings to those we provided and if you try to fix them to different wall types.
We attach assembly instructions with every parcel.
Place the table top upside down on the floor or on the flat steady surface. You can see four holes numbered 1, 2, 3 and 4. Each hole will match the holes and numbers written on the top of the table legs. Insert wooden dowels into each hole on the table top and attach legs to it.
At the bottom (as seen) of each side of each table leg notice a few more holes. Insert the screws into each holes at an angle (as shown) and use a screwdriver to fit them in.
IF YOUR TABLE INCLUDES THE SHELF: Attach the shelf to the legs first, before attaching them to table top. Follow the same instruction as shown in above: Holes - wooden dowels - screws.
Once the screws are solid and there is no movement, you can turn the table up.